Incubating chicks, or anything for that matter, can be an exciting and education activity. However, in order to have a great experience, certain things need to happen to ensure your eggs develop into healthy chicks, and those chicks grow into thriving chickens! In an effort to keep this short, I have split this post into two parts. Part 1 (you are here!) covers everything from properly acquiring and storing hatching eggs, to the hatch date! Part 2 covers the ‘post hatch’ brooding period from one day old all the way to 6 weeks old.
Selecting Your Eggs
Mildly Fun Fact: A newly hatched chick doesn’t eat for up to 2-3 days!
Because of this fact, it is extremely important to select properly formed eggs from healthy laying hens before you start the incubation process. A chicks first days of nutrition all come from the yolk sac inside of the egg. Right before a chick hatches, they absorb the remainder of the yolk, and it powers them through the hatch and their first few days of life. Deficient eggs will not likely yield strong chicks.
If you are selecting your own eggs from your hens, try to keep the following in mind:
- Hen Nutrition: Make sure your hens have a balanced diet with at least 17% protein, and a regulated level of calcium. Most layer feeds will have this, but you can supplement with free choice oyster shell and the hens will take what they need. Having access to fresh greens and grass is also helpful to ensure the hens have a balanced diet. I like to supplement their fresh water with a poultry nutrition supplement powder you can find at most farm stores (UFA, Peavey Mart, etc.). Remember – healthy eggs help the baby chicks thrive!
- Temperature: Eggs need to be stored lower than room temperature but well above freezing to keep the embryos stable. Too high a temperature might cause the eggs to develop prematurely, then stop before you get them in an incubator. Provide your hens with shade and a cool space to lay in the summer. In the winter (depending where you live), you might have the opposite problem. Eggs that freeze before you collect them will crack, but it is important to know that eggs may freeze to the point of spoiling the embryo before a crack is noticed. You can collect eggs multiple times a day in the cold, or just disregard the eggs altogether. When it is really cold, I don’t collect eggs for hatching purposes just in case of any freezing issues.
If you are purchasing eggs from someone else, you will want to ask to make sure they are providing eggs you think meet these guidelines. The following additional steps will apply if you have your own eggs or if you purchased eggs:
- Fresh Eggs: You don’t want to incubate eggs that are old as the embryos inside of the eggs are only viable for a short period of time. I like to stick to no more than 7 days, through I know some people have had success with eggs 10-14 days old. I do believe the ‘hatch rate’ declines after 7 days, so you might not have as many eggs hatch out of older eggs. When I collect hatching eggs, I gently mark each egg with the date using a pencil. If I am purchasing eggs from someone else, I look for similar markings. You also want to ensure hatching eggs are not washed as this removes the protective bloom that helps keep bacteria out.
- Storage: Egg storage is a bit tricky, but it helps to follow a few guidelines. The best temperature for storing eggs is about 12-14 degrees Celsius. I usually keep eggs in a colder room in my house (a spare room with the door and vent closed) or in my garage. Do not store hatching eggs in the fridge. When storing eggs, make sure the pointy side of the egg is down, this will help make sure the small air sac inside of the egg does not break or get misshapen. The toughest part of storing hatching eggs is turning them. There are a few ways to safely do this, as you don’t want the eggs to stay in one place for too long, or the embryo might stick to the side of the shell. I currently use an egg turner from an incubator (without the incubator) to store eggs and it turns them automatically every few hours. You can also store eggs in an egg carton, and put something like a book under one end, and alternate the end every few hours.
This might sound like a lot, but remember – these are just recommendations. People have had successful hatches with much less!
Incubator Prep
I won’t get into what the best incubator / hatching method is here – you can check out many, many Facebook groups if you are curious though! I will just share the things that have worked for us:
- Start with a Clean Incubator: If you have a new incubator, soap and water will do the trick, but if you have used it before, I recommend Virkon as a cleaner. Virkon is gentle enough to use (diluted according to the package) on styrofoam incubators and it contains ingredients that clean biological agents and bacteria safely. Which ever product you use, just ensure you rinse well after to make sure there is no residue left behind.
- Start Early: Fill the water reservoirs and start the incubator at least 24 hours before you plan to add eggs. This helps make sure the temperature is stable before you add the fragile eggs!
- Monitor Closely: Most incubators come with a fairly reliable thermometer and humidity gauge. I like to supplement this with a wireless sensor inside the incubator. Amazon has LOTS of similar products you an use if you are interested. Research the temperature and humidity that the eggs you are incubating need. Chicken eggs do well at 99.5 degrees Fahrenheit, but other poultry needs may differ. Humidity levels can be quite controversial, but I use the standard ‘wet hatch’ method and control the humidity throughout the hatch. Some prefer to use the ‘dry hatch’ method – but I have no information on this!
Incubation Days 1 – 18
Here comes the exciting part! Once you have your eggs loaded into your incubator (pointy end down, and on the turners if you are using them), you have to be patient. Other than monitoring the temperature and humidity closely, you don’t want to open the incubator too much. Here are the most important things to watch for the first 10 days:
- Egg Turning: If you have an automatic turner, just make sure it is plugged in and it should be good to go! If you are hand turning, try marking one side of the egg so you know you have turned them all, and try to turn 3-7 times per day. It helps to turn them an odd number of times so they rest on a different side each night. When you are turning eggs, you are really just gently flipping them over along their long side, you don’t want to vertically turn them or be too rough.
- Temperature / Humidity: Watch these closely and make adjustments as needed. For most incubators this is fairly easy to do as long as your incubator is set up some place where the temperature is consistently around room temperature. Try to avoid windows and doors.
Around day 10 – 12 you can ‘candle’ your eggs. You can do this with a flashlight or phone flashlight, or you can purchase an egg candler. The goal is to gently take each egg, place it up near the light, and you can see the development inside of the egg. It helps to do this in a light room. Dark shelled eggs might be tough to see, but still try it! Red veins and movement are good signs, but there are a few signs to watch out for. If you see a ring around the inside of the egg, it means the egg has stopped developing. If you see nothing (just a yellow inside – that is the yolk) it likely means the egg never started developing, or wasn’t fertilized. The pictures below might help demonstrate what to look for!
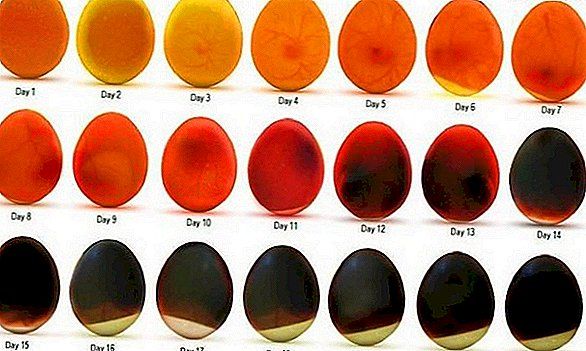
As you can see, the eggs get darker as the days go on, this is good! That means the chick is filling up the egg! You should be able to notice the air sacs getting bigger, and the eggs actually lose weight as the chicks develop.
If you smell anything funky coming from an egg, or if you notice a red ring and no veins or movement it is best to toss the egg out. A spoiled egg can explode (hasn’t happened to me – but I have heard stories!) and spread bacteria and ruin your entire hatch. Sometimes you will see that an egg has stopped developing – so if you are nearing the end of the hatch and you do not see something similar to the chart above, it is likely that egg is no longer viable.
Once you have candled your eggs and have disposed of any that are no longer viable, remember to close up your incubator quickly and stabilize the temperature and humidity again. You want to candle your eggs as quickly and safely as possible. Now, once more, be patient and monitor until about day 18!
Lockdown (Days 18 – 21)
Day 18 is an exciting day when you are incubating chicks! Please note that the ‘day 18 lockdown’ recommendation is for standard chicken eggs, if you are hatching bantam eggs or other poultry such as turkeys or ducks the dates will be different!
Once again, carefully open your incubator and candle the eggs. Be quick and gentle! Dispose of any eggs that are not viable and then the fun begins! Gentle take the eggs out, and remove the turner from the incubator if you have one. I also like to lay down a non slip surface (such as non slip cupboard liner) to protect the chicks delicate legs and feet. Then, gently lay each egg on its side, fill the water reservoirs (generally you need a higher humidity at lockdown), and close the incubator, If your incubator has a vent, you will want to open it to increase airflow, but keep an eye on the humidity to ensure it does not drop. This phase is called ‘lockdown’ because the eggs need to stop moving and cannot be disturbed by opening the incubator.
Around day 19 or so you might start hearing ‘peeping’ coming from the incubator. You might even see eggs wiggling or a small ‘pip’ in the egg. This is a little crack and it means that the chick has started to push its way out! Be patient and do not help or open the incubator. Your chicks might hatch any time, but remember they can stay safely in the incubator or up to 2-3 days if needed. You don’t want to remove any chicks while others are hatching.
Hatching
Standard chicken eggs generally hatch around day 21. This really can mean any time between day 18 – 24, but this is less common. Keep a close watch and don’t open the incubator.
After the chicks ‘pip’ a small crack in the egg, they will wait a few hours before they continue to hatch. This is normal so don’t worry! They start to breathe air outside of the egg and are absorbing the last little bit of their egg yolk. Once they have had a break, they will begin to ‘unzip’ which literally looks like they are trying to break the egg in half horizontally. They will carefully make their way around the entire egg, then kick their way out. It is an exciting process to watch, but it is also important not to open the incubator during this time. Opening the incubator causes the humidity to drop which might result in the egg membrane drying around the chick and prevent the chick from moving the way it needs to.
Once you have several chicks hatched, it might be tempting to move them to their new home – the brooder! Part 2 of this article will cover hatching issues & fixes, and the brooding stage post hatch! The video below shoes some of the hatching process – check out our YouTube Channel for more videos!
